Navigation
Install the app
How to install the app on iOS
Follow along with the video below to see how to install our site as a web app on your home screen.
Note: This feature may not be available in some browsers.
Thêm tùy chọn
Style variation
You are using an out of date browser. It may not display this or other websites correctly.
You should upgrade or use an alternative browser.
You should upgrade or use an alternative browser.
Hướng dẫn World of Warships
- Thread starter pip8184
- Ngày gửi
pip8184
C O N T R A
- 3/1/03
- 1,954
- 16
- Thread starter
- #2
Bài đầu tiên là bài hướng dẫn chơi tàu sân bay trên trang chủ EU và NA. Trang chủ SEA chưa có vì đệch có thằng nào dịch ra các thứ tiếng khác nhau :p
Tàu sân bay trong WoWS là một lớp tàu cá biệt và đặc sắc. Chúng giao tranh với tàu địch bằng những cơ chế riêng. Bạn sẽ cần phải làm quen với (nhiều) những tính năng khác biệt của tàu sân bay. Chúng tôi đã gom lại 10 'lời khuyên xấu' về cách chơi tàu sân bay cũng như đưa ra ý kiến riêng của mình về điều kiện cần và đủ để làm chủ những con thủy quái bằng thép này.
Lời khuyên xấu: Hãy giấu tàu sân bay của bạn vào một xó bản đồ để quân địch không thể tìm thấy bạn.
Cho dù bạn nên tránh xông lên tuyến đầu của bất kỳ cuộc giao tranh nào, nó cũng ko có nghĩa là bạn tách biệt bản thân quá xa khỏi khu vực chiến sự. Điều máy bay đến vùng chiến khác hẳn với việc nã một quả đạn pháo: thời gian để máy bay tới được mục tiêu là tương đối dài. Và một khi chúng đã thả bom hay ngư lôi thì chúng cũng cần phải về tàu của bạn để nạp đạn. Bắt chúng bay quá xa để đến và rời mục tiêu quả thực không hiệu quả.
Tốt nhất là bạn nên theo đuôi đội tàu chiến của phe bạn, không quá gần cũng không quá xa, vừa đủ là đẹp. Nếu bạn hỗ trợ đồng đội của mình, thì chính họ cũng sẽ hỗ trợ bạn nếu quân địch bắt đầu gây sự với tàu của bạn.
Lời khuyên xấu: Tàu sân bay không cần di chuyển. Bạn cứ ngồi im và điều máy bay vào chiến đấu
Trong hải chiến, một con tàu nằm im là một mục tiêu dễ dàng. Không có con tàu nào đảm bảo an toàn không bị đánh lén, tấn công từ sườn hoặc từ trên không cả. Sẽ rất khó thoát ra khỏi 1 tình huống phức tạp nếu bạn bắt đầu từ mo, hãy luôn duy trì động cơ vận hành trong mọi trường hợp. Ngay cả khi bạn tránh được việc chạm trán với quân địch không có nghĩa là bạn đã an toàn. Bằng cách theo dõi các phi đội của bạn, quân địch có thể dễ dàng định vị được vùng bạn đang hoạt động. Vì thế nhiệm vụ của bạn là luôn khiến cho quân địch phải đoán.
Bạn sẽ dành phần lớn thời gian nhìn trên bản đồ và điều khiển các phi đội, hãy nhớ sử dụng công cụ lái tự động và đặt nhiều mốc di chuyển để tránh mắc kẹt vào rìa bản đồ hoặc mắc cạn
Lời khuyên xấu: Máy bay bay cao và nhanh, không ai sờ được vào chúng!
Tàu địch luôn lo ngại bị tấn công bởi máy bay cất cánh từ tàu sân bay, và vì thế chúng thường được trang bị kỹ càng. Đa số tàu chiến, đặc biệt là thiết giáp hạm (bb) và tàu sân bay luôn được trang bị pháo phòng không, hệ thống phòng không này sẽ bắt đầu khai hỏa từ cự ly đáng kể. Khi bạn điều khiển phi đội bay trực tiếp đến mục tiêu, nhiều khả năng máy bay của bạn sẽ phải bay qua nhiều khu vực phòng không (bay qua đầu chiến hạm khác) và bị thiệt hại. Điều này làm cho sức tấn công của phi đội yếu đi trước khi tiếp cận được mục tiêu.
Chúng tôi khuyên các bạn nên cho máy bay đi theo vòng xuyến, tức là né xa các nhóm tàu địch không có mục tiêu mong muốn. Việc này tuy tốn thời gian hơn nhưng sẽ đảm bảo thiệt hại ở mức tối thiểu và góp phần nâng cao hiệu quả của bạn.
Lờ khuyên xấu: Bạn phải luôn tấn công mục tiêu đầu tiên xuất hiện, xài hết đạn dược và quay về tàu để nạp đạn, lập lại, v.v.
Các phi đội tấn công của bạn là tài nguyên vô cùng quý giá, đừng liều mạng phung phí chúng bằng cách ném chúng vào chiến đấu trước khi có được bức tranh tương đối rõ nét về khu vực giao tranh. Một trong những ưu thế hàng đầu của tàu sân bay là khả năng quan sát toàn trận đánh. Một thuyền trưởng khôn ngoan sẽ đánh đúng lúc đúng chỗ cần thiết, tìm cách gây được ảnh hưởng lớn nhất có thể.
Lấy ví dụ: Một thiết giáp hạm trong một eo biển nhỏ sẽ rất khó tránh máy bay thả bom. Một chiếc tuần dương hạm (CL) đang bám lấy bờ biển sẽ khó có cơ hội né ngư lôi của bạn. Luôn tìm cơ hội để khai thác sai lầm của đối phương. Ngoài ra, bạn cũng cần theo dõi xem đồng minh nào cần giúp đỡ.
Lời khuyên xấu: Bạn cần phải tách các phi đội ra và tấn công càng nhiều tàu địch càng tốt
Một phi đội riêng lẻ sẽ khó có thể gây ra thiệt hại nặng nề cho một chiếc tàu địch, tàu địch có thể dễ dàng né ngư lôi và bắn rơi bớt phi đội của bạn bằng súng phòng không nếu không bị gây áp lực. Bạn cần phải lên kế hoạch cẩn thận cho từng đợt tấn công. Thay vì sử dụng 1 đội ngư lôi, hãy thử tấn công từ cả hai phía, giảm khả năng tàu địch có thể né thoát. Những kế hoạch tập kích này không chỉ có tiềm năng gây ra sát thương cực lớn, mà còn ép tàu địch vào những vị trí không thuận lợi, tách rời địch khỏi đồng đội. Hãy sáng tạo và thử nghiệm!
Tuy nhiên, bạn cũng không nên đi tới cực đoan khác là điều tất cả các phi đội chỉ để diệt 1 mục tiêu. Khi đó bạn sẽ có nguy cơ trở thành mồi ngon. Giữ lại một phi đội dự bị có thể giúp bạn giảm bớt rủi ro, nhưng tốt nhất là nên ở gần đồng đội để được bảo kê.
Lời khuyên xấu: Đặt các mốc di chuyển cho phi đội, rồi sau đó bạn tha hồ pha trà check email
Tin xấu cho những người có thời gian tập trung ngắn, điều khiển một chiếc tàu sân bay là công việc toàn thời gian (nhưng vui). Việc bạn lên kế hoạch cho một đợt tấn công tới từng chi tiết và liên tục theo dõi là tối quan trọng.
Các phi đội thả ngư lôi tấn công tốt nhất khi vuông góc với hướng di chuyển của tàu địch, và chỉ huy tàu địch sẽ làm mọi thứ có thể để bạn không thực hiện được việc đó. Bạn sẽ phải liên tục chỉnh sửa đường bay để đạt được véc tơ tấn công tối ưu. Điều đó cũng áp dụng với máy bay ném bom, dù bạn sẽ muốn tấn công tàu địch từ mũi hay đuôi. Vì sao? Bời vì nếu làm đúng, bom của bạn sẽ rơi dọc theo chiều dài của máy bay địch. BÙM!
Lời khuyên xấu: Nếu bạn thả đủ ngư lôi vào 1 hàng dài những tàu chiến, chắc chắn sẽ có vài quả trúng!
Nếu bạn chỉ trúng được vài quả ngư lôi, trải ra nhiều tàu địch, thì sẽ không thể hiệu quả bằng việc bạn trúng hầu hết ngư lôi vào số ít tàu (tốt nhất là 1). Mỗi đợ tấn công cần phải đạt hiệu quả càng cao càng tốt. Đánh trúng mục tiêu và trở về nguyên vẹn phải luôn luôn là mục tiêu của bạn!
Cho máy bay lao vào một nhóm đông tàu địch chỉ làm cho máy bay của bạn bị bắn rơi. Và ngay cả khi bạn có gây được chút ít thiệt hại, thì cuộc đánh đổi có lẽ không hề có lợi cho bạn. Bạn cần phải luôn duy trì đỉnh cao hiệu quả trong cả trận đánh. Hết máy bay hả? GG.
Lời khuyên xấu: Phi đội giống như đạn pháo. Chúng chỉ tốn thời gian bay hơn và chính xác hơn.
Cho dù bắn trúng tàu địch với đạn pháo cần phải có tính toán và ước lượng tốt (dựa vào tốc độ tàu địch, khoảng cách, v.v), điều khiển phi đội của bạn cho một đợt tấn công là câu chuyện hoàn toàn khác.
Máy bay không phải đạn pháo, mỗi phi đội sẽ đến mục tiêu ở thời điểm khác nhau, nghĩa là đội nhanh nhất sẽ bay lòng vòng quanh mục tiêu và thu hút phòng không không cần thiết. Để tránh điều này và đảm bảo đợt tấn công nhanh gọn hiệu quả, hãy lên kế hoạch đường bay cho từng phi đội riêng biệt và thực hiện tấn công đồng thời.
Ngoài ra, bạn chỉ có bằng đó máy bay có thể nhét lên tàu sân bay của bạn. Hãy lập kế hoạch trước cho mỗi lần cất/hạ cánh. Nó sẽ giúp bạn tiết kiệm rất nhiều thời gian!
Lời khuyên xấu: Chỉ nên bem BB vì chúng bự!
Điều khiển tàu sân bay hoàn toàn xoay quanh việc làm chủ bầu trời. Điều đó có nghĩa là nếu tàu sân bay của địch và các phi đội của hắn cần phải là mục tiêu hàng đầu của bạn. Tàu sân bay ghét nhau. Nó giống như 2 bếp trưởng trong cùng 1 bếp bé tí tẹo. Chúng không thể chấp nhận nhau, một trong hai phải biến... Và vì thế hãy luôn nhắm đến mục tiêu là tiễn địch về thay vì bạn!
Quay lại tàu sân bay: Để hoàn thành vai trò của bạn trên chiến trường, hãy bảo kê đồng đội bằng cách theo dõi hoạt động của các phi đội địch. Nhiệm vụ của bạn là ngăn chặn các phi đội tấn công, dụ máy bay ném bom và máy bay thả ngư lôi vào trận địa phục kích, đồng thời tuần tra các khu vực quan trọng trên bản đồ.
Ví dụ, hộ tống 1 nhóm đồng minh với máy bay tiêm kích và ném bom, bạn có thể đánh chặn máy bay địch bạn gặp hay tấn công tàu địch nếu chúng vào tầm. Hợp sức mạnh của máy bay bạn và vũ khí của đồng đội, bạn sẽ kết liễu nhanh gọn quân địch, tạo điều kiện cho phe bạn, và máy bay của bạn, hoàn thành nhiệm vụ quan trọng một cách xuất sắc.
Và chúng tôi hi vọng bạn sẽ đúc kết được nhiều kinh nghiệm từ những lời khuyên xấu trên. Chúng tôi tin rằng bạn sẽ đọc được ẩn ý trong các câu chữ. Tồi tệ là nhất!
Mình xin đóng góp 1 ít
"In the game it's 5 class :
BB inclued BC the carcteristic big armor , big gun very big damage and very longe reach but a slown reloading ~ 3/rate of fire by min and a slow speed and maniability .
CA good armor but less than A BB and good gun big damage and good reach , medium speed and maniability
Cl idnetical in the CA but is less armor and the degat for sheel and the gun had a medium reach and fast speed and maniability .
DD it's the scout its greatest asset it's a very fast speed and fery good maniability and he was a torpedo very dangerous for a enemy BB
CV it's arty of world of warships he was launching airacft and the aircaft kill the ennemy ships ( dive bomber , bomber torpedo ) the cv was hiden , and he was a medium speed and medium maniability he was launching a aircaft scouts ( the kamikaze was not confirmed )"
Dưới đây mình xin phép chỉ nói về máy bay, còn tàu thì các bạn tự xữ nhìn vậy chứ CV đc trang bị khá nhiều gun AAA, có tàu còn có gun to nhưng phải click mới chịu bắn nên các bạn tự tìm hiểu dùm mình.
- Chơi CV bạn nên thuần phục di chuyển
trong di chuyển, game đã thiết kế cho bạn cách đi theo kế hoạch, ở đây làbằng nút shift, khi bạn di chuyển đến vị trí nào đó, bạn có thể dùng shift để đánh dấu thêm hành trình của các máy bay mình, cách di chuyển này khá hiệu quả khi bạn điều khiển nhiều đội máy bay, hạn chế trường hợp tàu địch tổ lái, lạng lách đánh võng.
Bạn có thể thay đổi hành trình bằng cách bấm vao điểm nối giửa các hành trình (cái đốm đỏ đỏ, xấu xấu), di chuyển cái điểm đó tới chổ khác.

- Dùng alt để thả torpedo.
Những bạn mới tham gia chơi CV lúc đầu sẽ chỉ biết lái máy bay rồi bấm vào tàu địch để thả, thả như vậy máy tính sẽ tự tính toán góc để thả và thả theo hướng rẻ quạt, cách này dể dàng vì đã có máy tự tính sẳn nhưng hiệu quả rất kém vì thả rẻ quạt tàu địch rất dể né torp, thường chỉ để kết thúc bọn DD tổ lái hoặc bọn máu ít cần 1 2 quả là đi.

Hình trên chỉ ra sư khác nhau của thả đại và thả alt.
Còn thả bằng alt, lợi ích trước mắt là bạn có thể định trước hướng của torp, torp của bạn đi theo đường thẳng và đạt hiệu suất damage cao nhất trong chiến đấu nếu trúng đích.
Để thả bằng alt hiệu quả, cơ bản nhất là di chuyển máy bay đi tới theo hướng bạn nghĩ sẽ thả, xem xét tốc độ, hướng di chuyển của tàu địch để quyết định bạn sẽ đi đến hướng nào, quay đít về đâu, thả ở đâu sau đó click click, alt + click và bùm, xong đơn giản nhỉ

Để đi sâu hơn vào thả torp, mình xin trình bày 1 chút về cái hình trên là hình mà sau khi ấn alt sẽ hiện lên.
+ số 1 là hướng máy bay bạn đang đến, cái mà CÓ THỂ đc quyết định bỡi di chuyển phía trên.
+ số 2 là điểm máy bay bắt đầu hạ độ cao bước vào giai đoạn thả torp, điểm này sẽ rõ ràng dể nhìn hơn khi bạn bấm chuột chọn thả, do mình k chụp đc hình đó nên lấy đại hình này, cái điểm đó có thể thay đổi, nhưng chỉ xoay xoay trong vòng tròn, bạn thay đổi càng xa điểm 1 thì máy bay sẽ mất nhiều thơi gian hơn để tìm, chỉ nên áp dung khi bạn thành thục di chuyển để thay đổi điểm 2 và 1 sao cho hợp lý, qua điểm này coi như xong, bạn k thể thay đổi gì nữa
+ khoản cách 3 - hơn 4 chút xíu là nơi mà torp sẽ rớt xuống bắt đầu di chuyển, lưu ý là giả sữ nếu torpedo của bạn có chạm vào tàu địch trong khoản cách này sẽ k lên bất cứ damage nào và sẽ biển mất, mình cũng chã hiểu tại sao có cái thể loại biến mất này :(
+ từ 4 - 5 là khoản cách và hướng mà tỏrp có thể đi, trong khoản cách này torp sẽ gây damage.
+ Hình này còn thiếu 1 chổ là tâm của vòng tròn, ngay tâm sẽ có 1 chổ để bạn có thể thay đổi vùng thả torp, chỉ cần click và kéo tâm qua chổ khác thôi, khi đổi tâm có thể bạn phải thây đổi số 1 và 2 để phối hợp ăn ý và tồn ít thời gian nhất.
- Về góc độ trong thả torpedo
như trên mình đã nói, nhiệm vụ của bạn chỉ là cố gắng ghim càng nhìu torp vào tàu địch càng tốt, gốc độ tốt nhất để ghim là 90 độ vuông gốc với thân tàu địch và tất nhiên sẽ k có tàu nào dể dàng phơi side ra để cho bạn ghim, cho nên mình xin nhắc lại "di chuyển là 1 bộ môn chính cần phải thuần phục để tốt nghiệp".


do thường bị chống cự nên thả méo méo thể này chứ hiếm khi đc vuông góc


còn đây là 1 chiến thuật khác, thả cùng 1 lúc cả 2 bên để tàu địch khỏi né, yêu cầu kỉ thuật di chuyển tốt để kiểm soát cả 2 đội.

còn này là 1 pha thả lổi của mình, chỉ gim đc vài quả
sau đó hình như là bị fighter địch giết phải đếm số 1 đội

trong khung đỏ bên trái là số lượng máy bay có trong đội bay đó, số 6 là 6 chiếc, bị giết thì giảm dần về 0.
còn khung đỏ bên phải là số lượng máy bay các loại còn lại trong kho, đội ở ngoài chết bớt, hoặc chết sạch sẽ lấy từ nguồn này ra để bổ sung.

còn cái thứ này là thứ mình ghét nhất, scout plane.
Cuối cùng bài viết của mình có tham khảo 1 ít hình của topic http://forum.worldofwarships.eu/index.php?/best-content các bạn có thể tham khảo thêm nhiều điều thú vị tại đó.
----------------------------
skill
"In the game it's 5 class :
BB inclued BC the carcteristic big armor , big gun very big damage and very longe reach but a slown reloading ~ 3/rate of fire by min and a slow speed and maniability .
CA good armor but less than A BB and good gun big damage and good reach , medium speed and maniability
Cl idnetical in the CA but is less armor and the degat for sheel and the gun had a medium reach and fast speed and maniability .
DD it's the scout its greatest asset it's a very fast speed and fery good maniability and he was a torpedo very dangerous for a enemy BB
CV it's arty of world of warships he was launching airacft and the aircaft kill the ennemy ships ( dive bomber , bomber torpedo ) the cv was hiden , and he was a medium speed and medium maniability he was launching a aircaft scouts ( the kamikaze was not confirmed )"
Dưới đây mình xin phép chỉ nói về máy bay, còn tàu thì các bạn tự xữ nhìn vậy chứ CV đc trang bị khá nhiều gun AAA, có tàu còn có gun to nhưng phải click mới chịu bắn nên các bạn tự tìm hiểu dùm mình.
- Chơi CV bạn nên thuần phục di chuyển
trong di chuyển, game đã thiết kế cho bạn cách đi theo kế hoạch, ở đây làbằng nút shift, khi bạn di chuyển đến vị trí nào đó, bạn có thể dùng shift để đánh dấu thêm hành trình của các máy bay mình, cách di chuyển này khá hiệu quả khi bạn điều khiển nhiều đội máy bay, hạn chế trường hợp tàu địch tổ lái, lạng lách đánh võng.
Bạn có thể thay đổi hành trình bằng cách bấm vao điểm nối giửa các hành trình (cái đốm đỏ đỏ, xấu xấu), di chuyển cái điểm đó tới chổ khác.

- Dùng alt để thả torpedo.
Những bạn mới tham gia chơi CV lúc đầu sẽ chỉ biết lái máy bay rồi bấm vào tàu địch để thả, thả như vậy máy tính sẽ tự tính toán góc để thả và thả theo hướng rẻ quạt, cách này dể dàng vì đã có máy tự tính sẳn nhưng hiệu quả rất kém vì thả rẻ quạt tàu địch rất dể né torp, thường chỉ để kết thúc bọn DD tổ lái hoặc bọn máu ít cần 1 2 quả là đi.
Hình trên chỉ ra sư khác nhau của thả đại và thả alt.
Còn thả bằng alt, lợi ích trước mắt là bạn có thể định trước hướng của torp, torp của bạn đi theo đường thẳng và đạt hiệu suất damage cao nhất trong chiến đấu nếu trúng đích.
Để thả bằng alt hiệu quả, cơ bản nhất là di chuyển máy bay đi tới theo hướng bạn nghĩ sẽ thả, xem xét tốc độ, hướng di chuyển của tàu địch để quyết định bạn sẽ đi đến hướng nào, quay đít về đâu, thả ở đâu sau đó click click, alt + click và bùm, xong
đơn giản nhỉ
Để đi sâu hơn vào thả torp, mình xin trình bày 1 chút về cái hình trên là hình mà sau khi ấn alt sẽ hiện lên.
+ số 1 là hướng máy bay bạn đang đến, cái mà CÓ THỂ đc quyết định bỡi di chuyển phía trên.
+ số 2 là điểm máy bay bắt đầu hạ độ cao bước vào giai đoạn thả torp, điểm này sẽ rõ ràng dể nhìn hơn khi bạn bấm chuột chọn thả, do mình k chụp đc hình đó nên lấy đại hình này, cái điểm đó có thể thay đổi, nhưng chỉ xoay xoay trong vòng tròn, bạn thay đổi càng xa điểm 1 thì máy bay sẽ mất nhiều thơi gian hơn để tìm, chỉ nên áp dung khi bạn thành thục di chuyển để thay đổi điểm 2 và 1 sao cho hợp lý, qua điểm này coi như xong, bạn k thể thay đổi gì nữa
+ khoản cách 3 - hơn 4 chút xíu là nơi mà torp sẽ rớt xuống bắt đầu di chuyển, lưu ý là giả sữ nếu torpedo của bạn có chạm vào tàu địch trong khoản cách này sẽ k lên bất cứ damage nào và sẽ biển mất, mình cũng chã hiểu tại sao có cái thể loại biến mất này :(
+ từ 4 - 5 là khoản cách và hướng mà tỏrp có thể đi, trong khoản cách này torp sẽ gây damage.
+ Hình này còn thiếu 1 chổ là tâm của vòng tròn, ngay tâm sẽ có 1 chổ để bạn có thể thay đổi vùng thả torp, chỉ cần click và kéo tâm qua chổ khác thôi, khi đổi tâm có thể bạn phải thây đổi số 1 và 2 để phối hợp ăn ý và tồn ít thời gian nhất.
- Về góc độ trong thả torpedo
như trên mình đã nói, nhiệm vụ của bạn chỉ là cố gắng ghim càng nhìu torp vào tàu địch càng tốt, gốc độ tốt nhất để ghim là 90 độ vuông gốc với thân tàu địch và tất nhiên sẽ k có tàu nào dể dàng phơi side ra để cho bạn ghim, cho nên mình xin nhắc lại "di chuyển là 1 bộ môn chính cần phải thuần phục để tốt nghiệp".

do thường bị chống cự nên thả méo méo thể này chứ hiếm khi đc vuông góc
còn đây là 1 chiến thuật khác, thả cùng 1 lúc cả 2 bên để tàu địch khỏi né, yêu cầu kỉ thuật di chuyển tốt để kiểm soát cả 2 đội.
còn này là 1 pha thả lổi của mình, chỉ gim đc vài quả
sau đó hình như là bị fighter địch giết phải đếm số 1 đội
trong khung đỏ bên trái là số lượng máy bay có trong đội bay đó, số 6 là 6 chiếc, bị giết thì giảm dần về 0.
còn khung đỏ bên phải là số lượng máy bay các loại còn lại trong kho, đội ở ngoài chết bớt, hoặc chết sạch sẽ lấy từ nguồn này ra để bổ sung.
còn cái thứ này là thứ mình ghét nhất, scout plane.
Cuối cùng bài viết của mình có tham khảo 1 ít hình của topic http://forum.worldofwarships.eu/index.php?/best-content các bạn có thể tham khảo thêm nhiều điều thú vị tại đó.
----------------------------
skill
Nations
[spoil]
Currently there are two nations implemented in game, Japan and the United States of America. More nations will follow, but each should outline some specific ship characteristics.
Japan
Japanese ships were built mostly with more turrets on the stern than on the bow (since engineer believed bow turrets would be affected a lot by bad weather and rough seas). Thus generally you have more firepower aft than front. This is interesting when you turn away from enemy ships, as you can keep a lot of firepower on the enemy.
Another characteristic of japanese ships is, that they had a lot of very fast and hard hitting torpedoes. Even almost all japanese cruisers (except for tier 2) have at least 2 sets of torpedo launchers equipped. Also japan has the most long range torpedoes with very good speed (up to 62 knots). Also destroyers and cruisers are quite fast and nimble.
Tactically that means, that japanese ships will want to close the range to use their torps. It also means, that if you can ambush enemies around islands etc. you have a pretty good chance on dealing devastating hits with your torpedoes. Even cruisers can sink battleships with a full torpedo salvo.
The downside however is, that they are rather lightly armoured. Especially japanese cruisers are prone to AP hits, since their armour is somewhat lacking.
United States of America
American ships have been designed as allrounders. Key feature of most American ships is their gun handling. Usually turrets aim very fast on american ships and they usually sport a large amount of lower (in comparison to Japan) calibre guns.
Additionally, while their torpedoes are nowhere near as good as the japanese. American ships launching torpedoes have to go to almost point blank range to use them, risking to take a lot of hits. If you go american DDs, you will need to use your smoke wisely and as an offensive measure to get in close, when there are no islands around.
Cruisers on the other hand can unleash a rain of steel at intermediate ranges. Their fast firing guns can output tremendous DPM and are a nightmare for enemy DDs. Additionally while they don't have torpedoes, they do sport lots of AA guns, making american cruisers the best ships to escort your BBs and CVs, forming a barrier between them and the enemy DDs and CAs.
[/spoil]
Navigation and Maneuvering
An essential part of playing WoWS is getting your ship where it can be useful. What you have to bear in mind though is that ships are quite large and sail through water. That has some serious consequences.
[spoil]
Stopping your ship
While it seems quite obvious that ships won't stop dead when you stop the engines (attention: in WoWS setting the engines to STOP is effectively the same as putting them to full reverse until your ship stops) it is something you have to bear in mind when you sail around. You can't just stop your ship on the spot like a tank, you will always glide about 4 times your ship's length further, even when you put your engines to full reverse. So when you want to stop behind an island to avoid incoming fire, bear in mind that your ship needs considerable time to stop (and to accelerate after that again) and that you have to do it early.
Turning your ship
Even worse than just stopping your ship is turning it. That gets extremely problematic when you're in something big like a BB. The ship do not only require some time until they actually respond to the rudder, the rudder itself takes quite some time to shift from neutral to the side. That means, a BB can't simply alter her turn the other way, when there is something incoming. She will follow that path a little longer until the rudder responds. So don't let DDs get in close, because you can't react to that fast enough in a BB.
Okay since I'm playing Captain Obvious atm, what's also worth noting is, that water reacts differently than solid ground. That has its effects on ships too. While we do have a simplified physics model in game, ships do actually "drift" when turning. When a ship turns its rudder, it basically causes the ship to turn around its center of mass (which is somewhere in the middle of that ship). So if you give left full rudder, your ship will turn left - the bow of the ship at least. The aft of the ship will sadly turn right first. This will cause the ship to drift a little in the direction it was currently traveling. It will also cause the ship to drift a little when your rudder is back to neutral position.
Also ships do turn the same way if they are fast or slow. A ship turning at high speed will not sail a wider circle than a a slow ship. Slowing down doesn't really change the radius you are turning by much.
So when you're near land, don't cut it too close or you will drift into that land and sit hopelessly on a sandbank. Also you might eat two torpedoes instead of one when you try to evade, because your ship continues to go in a direction for a little time. It takes a little time getting used to, so remember this, when you want to change direction... Which leads us exactly to
Collisions
Collisons can and will happen. You cannot always control your course perfectly. There are two types of collisions. Gracing collisions with your teammates or the land, and dead on full speed ramming into enemy ships.
Colliding with team mates is very annoying. You have to spend some time with getting apart from each other. During that time, you both present a very good target for the enemies and also block each others turrets/torpedoes and can't shoot back properly. So avoid collisions with team mates. Watch the minimap and plot your course so that you do not collide. It will take you both out of battle for at least half a minute until you're clear of each other.
Colliding with islands can have simliar effects, although there are two ways which you can crash into land. The collision alarm is a bad sign, so you turn right away, right?
Not entirely, no. It is not always a good idea to turn when you hear or see the collision alarm. When you can safely clear the land, of course do it. When you can't avoid a collision, it is usually better to ram the rock head on. That way, you will stop dead in the water, yes, but you can actually reverse and plot a new course once you've reversed far enough away. The worst way of colliding with land is when you "drift" onto land (see turning your ship). If you manage to collide with land sideways, you can manage to lodge yourself onto a shallow. Now that your keel is sitting on that shallow, your propulsion has almost no effect whatsoever. If you're not outright stuck to that island, it will take you at least several minutes to come clear.
In short, either avoid a collision totally or ram it dead on. Anything else might end very badly for you.
Colliding with enemy ships is a totally different matter. The collision model currently favours the heavier ship - but not by much. Colliding with an enemy destroyer even as a battleship can cause serious damage - to both ships. A low HP BB can still be killed, even by a DD ramming it at full speed. Ramming enemy ships will result in very high damage to both ships - outright sinking BOTH ships often enough.
[/spoil]
Combat : Gunnery
[spoil]
Spotting and visibility
Spotting is done automatically with a system simliar to WoT. Smaller ships have higher camouflage factors than larger ships. When you're in the dock, you can click on each stat and see its effects on the ship. For example when you click visibility you can see the distance at which your ship will get spotted by land targets and by planes. This value is the unmodified value, but there are exceptions.
First destroyers can lay a smoke screen. It will lower their visibility - I don't know yet by how much, but feeling tells me, it should be something like 50% less spotting range for enemy ships. You have to be within or behind the smoke cloud however. If you're at the edges, normal spotting rules apply.
Firing your guns (note guns, torpedoes don't count here!) will increase your visibility. A BB firing her guns will cause her to be spotted at 20km or more. Basically when you shoot your guns, you can pretty much assume that you are spotted (there is a captain skill that will tell you if you are spotted). Secondary guns and AA guns count too in that department. So when you're in a smoke cloud and don't want your AA guns giving you away, press P to disable them.
Other than that, enemies will need a direct line of sight (that also counts for scout planes) to your ship. Any island in between you and the enemy will cause you to stay invisible.
Gunnery
Now that we see the enemy, we want to hit her with everything we've got. So how do we do that? One thing, I mentioned in a post up above is the ALT key. This is especially helpful, when you're at long to medium range. Ammo selection is largely dependent on range, gun and enemy. There are AP (armour piercing) shells that will do tremendous damage if they penetrate any armour - or do next to no damage if they don't penetrate or overpenetrate (go in and out on the other side) enemy armour. The other ammo type is HE (high explosive). HE will do average damage against most targets as it can only penetrate DDs and some CVs. However it can set enemy ships on fire for extra damage.
Long range fighting (10-20km) - BB range:
Here you have to aim carefully when you don't want your salvo to miss. Distance to the enemy ship is important as well is the flight time of your shells.
As a very crude rule of thumb, for every 10 seconds your shells have to travel, aim about the length of 1 BB (that equals about 200-250m) in front of the enemy. Of course this depends on speed. It's about the distance you have to lead a BB going the average 24 knots. If she goes very fast, you have to lead the target more, if she goes not so fast, you have to lead the target a little less.
Factor in the angle at which the enemy is driving towards you or away from you (use the Minimap!) and then estimate how much further or less far you have to shoot. If you're not sure, you can click once and fire a ranging shot to see how far off you are.
Plunging fire can be devastating here, because it hits the deck armour from above. AP shells at more than 15km can penetrate most armour (Note, only 200mm+ guns can shoot that far) even of battleships. Landing a hit is difficult though, because you have a lot of deviation here. If you struggle at hitting targets at that distance (especially cruisers and smaller) switch back to HE.
Medium range fighting (5km-10km) - CA range:
At this distance, AP ammo of cruisers gets problems penetrating BB armour. If you get too many glancing hits (these do about 100-500 damage) switch to HE. Against cruisers, you can still fire AP at that distance. DDs should always be engaged with HE, because even HE can penetrate them and even if it just impacts near them, this might be enough to cause critical hits or start a fire.
This is the closest distance BBs can use their main guns effectively. If they get any closer, the turrets will not follow fast enough to track a ship that is not a BB.
DDs can get plunging fire into enemy ships, but penetrating anything but a lightly armoured CA is unlikely. Thus HE is usually better - or not shooting at all and try to stay hidden.
Short range fighting (0 - 5km) - DD range:
At this distance, you are within torpedo range and the enemy can hardly avoid getting hit. It also means that you are now within range of the enemy secondary guns. They are quite deadly against DDs. Also be prepared to be set on fire here quite often in a BB or CA. DDs can however outmaneuver a BBs main batteries at that distance to land their torpedoes relatively easy.
Anything below a 200mm gun is unlikely to penetrate a BB here and even guns above 200mm might still struggle to get through. So 155mm and smaller might want to load HE here against BBs.
BB vs CA or large calibre CA vs CA can penetrate here. Use AP and aim for the enemy magazines (usually below the turrets). 155mm still can penetrate, but might not always do so, even if well placed. However their rate of fire can still be devastating when shooting HE.
Against DDs, well you might have guessed it, it's HE again. They simply get wrecked by HE hits at any distance. So DDs, turn often, turn fast, turn unpredictable and outmaneuver the enemy or you're toast. Use your smoke or you're toast. DDs are basically the most unforgiving class in combat - but can be really devastating with a well executed torpedo strike.
You may have noticed I've left out CVs. They tend to range between DDs and CAs in terms of armour, so HE is often the most useful ammo against them in terms of armour. It is however definitely the most useful ammo against them in terms of abilities. A burning carrier cannot start any planes. So setting a carrier on fire prevents him from launching any strikes that aren't currently airborn.
[/spoil]
Combat: Torpedoes
[spoil]
Range and Speed
Most torpedoes are rather short range weapons. While some japanese torpedoes (Type 93 Long Lance) can attain ranges of 20km, most torpedoes can't go much further than 5-7km. So torpedoes are rather a short range weapon.
Another thing - even with the long lance torpedoes - is that torpedoes are rather slow compared to other weapons. While a projectile fired from a gun can reach speeds of 1000 m/s, a torpedo can only attain speeds of 50-76 knots (40 m/s or 25 times slower). That means fast ships can outrun or outmaneuver torpedoes and friendly ships can run right into torpedoes because you didn't calculate them in. So always watch where you shoot those things - I've even seen carriers sink themselves with their own torpedo bombers.
Aiming and firing a torpedo
So, now that you are close enough to see the white in the enemy captain's eyes, how do you shoot these darn cigars? Well, the basic aiming works just like guns - you even get a white outline in torpedo view, showing you where to shoot the torpedoes - when the enemy ship doesn't change course, which they often do. So you have to lead the target again by yourself.
Unless you're in a point blank fight with a ship (then shooting torpedoes is basically a no-brainer), the enemy will usually try to avoid your torpedoes.
If your target is far away (near max torp range), you might want to chose a narrow spread (chose spread by pressing 3 while in torpedo mode). That might sound paradox at first, however don't forget one thing. Torps will be fired in an arc, meaning that once they reach the maximum distance, they will be far apart. If you shoot your torps in a wide spread, most ships will not have any problem passing in between your torpedoes. A wide arc only makes sense when you shoot at multiple targets (where not all enemies will be able to escape) or you're sailing something like a Kitakami (which can fire 20 torps per side).
Also when you fire your torpedoes and have more than one set of tubes, stagger your torpedoes. Try to anticipate in which direction the enemy will try to evade and then fire the second set so that they will hit there. If you do it in quick succession, you will force the enemy to take at least one or two hits. If you've got enough tubes to fire a wide arc (about 8-10 tubes minimum for that) you can overlap the arcs to have a wide arc with little gaps in between and thus rob him the possibility of evading your torps.
How to launch torpedoes unnoticed
Well you want your enemies to avoid as little of your torpedoes as possible. While you can still force them to take some hits with a good aimed staggered spread of torps, it is of course better to hit all torpedoes. To do that, you have to either approach very close to the target (risking being sunk by enemy secondary batteries) or the enemy mustn't know you are there and just shot torps.
The later you can achieve with either your smoke (although a good captain will notice smoke and evade the area) or islands. If you see CAs or BBs engaged around islands and you're on the other side, pay close attention when some of the enemies will likely come out behind the island. Launch your torpedoes before they notice you're there and they have little time to evade. If they fight in a battle line, it is likely they will hold the approximate course for some time. - And always keep an eye out for what your allies are doing. You don't want to torpedo them!
Save your shots
Last but not least, torpedoes got a long reload time. Don't waste a full spread of torpedoes on a cruiser with 2k health when you will likely run into other targets. Either finish it off with your guns (if it is safe to do so) or let your allies kill him and save your torpedoes. At first they have reload times of 30-40 seconds, but with rising tiers that can go up to more than 2 minutes. If you've just shot your torps, hide (unless you're in a japanese cruiser) and wait for the reload to almost finish before engaging again.
[/spoil]
Combat: Carrier Air Groups
So you've had your action game, now on to something completely different. With carriers, you basically trade in your action gameplay against a strategy game. Coordinating your air groups with moving you carrier around makes you use the map more and more. You will now need to use waypoints (SHIFT + CLICK on the map) and time your attacks to be effective.
[spoil]
Carrier Positioning
You don't want to be in the middle of the fight, however you also don't want to be too far away from it. Planes take a lot of time flying towards/from the enemy fleet, so basically, you want to hide closely behind your fleet and want to get out, if they seem to die or the enemy seems to break through.
Air group complements
A major difference from other ships is, that the air group complements that you can select in the modules screen in the dock are not necessarily getting better from top to bottom. They simply set how your air groups will be distributed. There will be fighter heavy loadouts, torp bomber heavy loadouts and bomber heavy loadouts. It isn't necessary to always mount the last, but better mount the one you're most comfortable with.
Launching aircraft
What you always should do with each carrier, is launch all air groups as soon as possible. An air group (keys 2-8) should always be up in the air while not rearming. It doesn't matter if they circle around for a while, they have unlimited fuel, just ammunition is limited - however you cannot launch any planes if your flight deck is burning. That's why you should keep them up in the air as often as possible.
Move your aircraft around
When scouting or attacking enemy ships, it is best to move your air groups together. Especially when you're executing torp bomber strikes, you want your squadrons close together, so that they will drop their ordnance close together. Also move your aircraft away from your carrier when you're not in immediate danger. The path on which they approach might lead the enemy carrier towards your position when you're not spotted.
Also watch where the enemy AA ships are and avoid those on planning your attacks. You don't have an indefinite amount of planes and once these are gone, you're just HP sitting around uselessly.
Fighters
Fighters are well fighters, they're best used against enemy bombers and scouts. A fighter vs fighter combat, you should only initiate when you're either a tier higher than the enemy carrier or your fighters got AA support from your other ships. Otherwise you're just trading fighters with the enemy carrier which will lead to nothing.
If you can't currently control your fighters manually, you can assign them to fly CAP (combat air patrol) over a friendly ship or with friendly bombers (by shift clicking onto the respective unit).
If you have lots of fighters left but only a few bombers and the enemy is bunching together for maximum AA coverage, you can also try to use your fighters to draw AA fire (sacrificing them) to allow your bombers to get through.
Dive Bombers
While most people deem them useless, they can actually be useful. The bombs they drop do HE damage, so they aren't very effective against BBs and only midly effective against CAs, but they can do some damage (and cause burning) to DDs an CVs. Also you can use them to eventually cripple a target with a cricital hit for your torp bombers to strike.
Torpedo Bombers
Torpedo bombers basically are your main anti ship weapon. Since torp bombers will fire a spread of 6 torpedos maximum (either all in a straight line or spreading out) that will deal mostly mediocre damage (at least on higher tiers) you want to maximize your hits. To do so, you want to coordinate an attack with either your dive bombers or ideally with two torp bomber squadrons. Launch them and keep them together, then set waypoints on either side of the target and add a waypoint to your target. (Planes will fly to the waypoint and if the waypoint is an enemy ship, they will engage it). Once your torp bombers are locked onto an enemy ship (or with ALT key on a free location), you can drag around the marker to select the angle and the approach towards the target ship. Do that so that the spread of torpedoes will overlap each other, so that your target ship can't escape.
Watch out for enemy AA there when planning your attack, so that the maximum number of bombers survive until they dropped their torpedoes. Then fly them out on a course that leads away from your ship and from the enemy AA.
Repairs
While essentially you should try to minimize the damage you take, don't use your damage control teams just because your carrier is burning. If you're still under fire, and have planes reloading on deck, wait for them to be reloaded, give the launch order and THEN use repair. Your planes can only take off, when your ship is not on fire, and if you're in danger of getting set on fire again, you might at least want to get your planes back in the air.
[/spoil]
Combat: Active Skills
[spoil]
Each ship has one or more active skills. Some are determined by the ships class and tier, others are independent and available on all ships. In this part, I'll give you a brief overview and some guidelines about when to use these skills.
Damage Control Party (Default Key: R)
The first (and universal) skill is damage control party. This skill basically repairs all (non critically) damaged modules on a ship, stops all fires and all floodings while active. It is active for a few seconds before it goes on cool down. The cooldown is relatively long (can be reduced by captain skill) and thus you should use it with care - but also not sparesly.
On DDs and CAs you can use it to stop fires, because you usually don't have that much HP to spare - but you should get out of the line of fire first if possible. Especially DDs can use their second skill (Smoke Screen) for that. On BBs you should try to compensate for fires with your Repair Work skill, before using Damage Control Party. On CVs consider using it, exactly before launching a wing of planes when you're still under fire, as you can't start planes with a burning flight deck.
The best use (independently of class) though is repairing rudders and propulsion systems, since those are essential for you getting out of harms way. Repairing guns/torp launchers usually isn't worth it, because those get repaired rather quickly.
Smoke Screen (Default Key: T)
Smoke Screen is a destroyer specific skill. It clouds a large area around your ship as long as it is active. Any ship within or behind the smoke screen recieves a visibility bonus, making DDs almost invisible while inside. It has a limited amount of charges, so use it wisely.
Usage can be both offensive (to approach for a torpedo attack) or defensive (to evade incoming fire) - what you should keep in mind is, that the smoke screen itself is widely visible, alerting enemies to your general position. So when you use it offensively, bear in mind, that an experienced enemy will turn away from the smoke and stay at a safe distance, so it might be best to wait with using it, until you're rather close.
Repair Work (Default Key: T)
Repair Work is the BB skill. It restores part of your hit points over time. I'm not entirely sure about the mechanic yet, but mostly the skill seems to repair ONLY the last hit recieved. Fire and Flooding in that department count as a single hit, thus are at least partly repaired along the initial damage. Like with Smoke Screen you have a limited amount of charges and a large cool down, so use them wisely. It's best used after recieving a penetrating AP hit or to repair fire/flooding damage.
Defensive Fire (Default Key: Y)
Defensive Fire finally is the CA skill. It is only available on CAs of Tier 6 and higher and increases their AA abilities. Any CA using this skill will cause incoming torpedo bombers to panic (releasing their torps ALWAYS in a fan instead of a straight line). So it is best saved for incoming bombers. Unlike Smoke Screen or Repair Work, it doesn't have limited charges, so you can activate it anytime you see bombers coming in.
Scout Plane (Default Key: T/Y)
The last skill is ship dependant. Some ships (Mainly BBs and higher tier CAs) have a scout plane on board. Launching a scout will increase your view range (as in the scout adds some addional spoting around itself).
You can't control the scout, it will simply circle around your ship. The radius is larger on BBs than on CAs.
With the large cool down and limited number of planes, using the skill is situation dependent. It's no use to launch scout planes at start (especially not, when you've got carriers around), since they won't spot anything on the larger maps.
If you see a scout plane of a ship alongside going up, save your scout to counteract smoke screens or ships trying to hide behind islands.
[/spoil]
Chỉnh sửa cuối:
StormAndFire
C O N T R A
- 23/2/09
- 1,509
- 7
cái scout plane thì không có ảnh hưởng gì đến torpedo bomber cả ... @@
bổ sung thêm 1 số điều:
+ Torpedo bomber luôn luôn thả theo đường thẳng, chỉ bị chuyển sang rẻ quạt khi bị AA quấy nhiễu (đặc biệt khi bay vào khu vực 2~3 tàu trở lên hoặc có Crusier gần đó)
+ Đối với BB cách thả tốt nhất là chéo nhau như bạn trên đã nói nhưng không nên thả cùng lúc, vì BB vẫn có thể giảm tốc hoặc tăng tốc vượt qua giảm tỉ lệ trúng xuống. Tốt nhất là cho 1 phi đội thả một bên trước và vẫn giữ phi đội còn lại bay gần đó sau đó khi BB bắn đầu quay thì thả tiếp phi đội còn lại. Lúc này BB không còn đủ thời gian để quay hay tăng hoặc giảm tốc nữa, nến canh tốt có thể full hit 6 torperdo.
+ Đối với Crusier thì vẫn áp dụng như BB nhưng thả cùng lúc, và nên chờ chuyển sang hình rẻ quạt rồi mới thả, vì lúc này torpedo từ 2 phi đội sẽ đan thành lưới, tăng tỉ lệ trúng lên nhiều hơn so với kiểu thả theo đường thẳng. Và đối với đa số Crusier thì chỉ cần 2~3 quả toperdo là xong rồi.
+ Đối với DD thì tốt nhất là dùng Bomber, nếu bạn có 2 phi đội bomber thì có khả năng kill được DD chỉ trong 1 lần tấn công. (theo kinh nghiệm của mình thì max damage của bomber thường bằng 1/2 HP của DD cùng tier)
bổ sung thêm có thể nhấn nút "Shift" và click hoặc dùng chuột (như khi chơi mấy game RTS vậy) để chọn nhiều phi đội cùng lúc.
Chỉnh sửa cuối:
The Iron Eagle
Sam Fisher, Third Echelon Agent
- 4/8/06
- 15,245
- 331
scout plane chỉ xài khi đến mấy cái cua quẹo thôi, vì có thể ẩn phía sau đó là tụi DD phục kích
The Iron Eagle
Sam Fisher, Third Echelon Agent
- 4/8/06
- 15,245
- 331
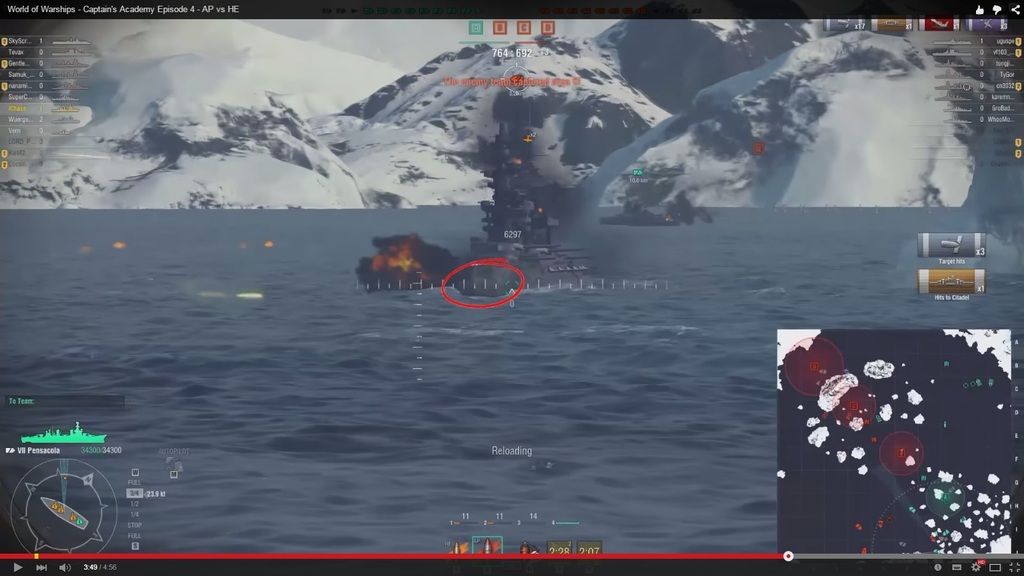
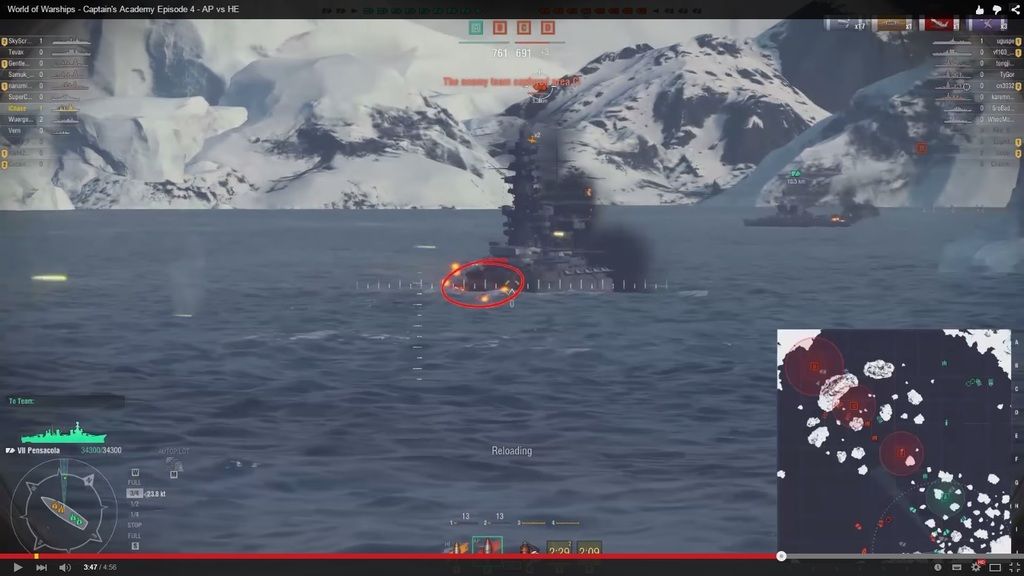
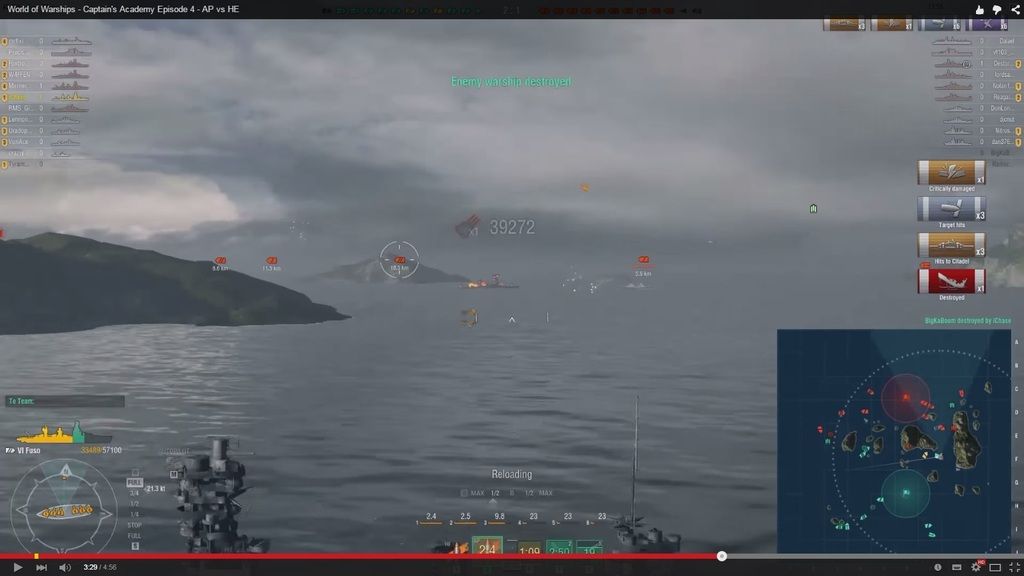
vài hình hướng dẫn bắn citadel lấy từ clip của thằng kia )")


- 17/11/08
- 7,550
- 4,155
có ông nào biết cách điều khiển scout ko hay nó chỉ auto bay vòng vòng ?
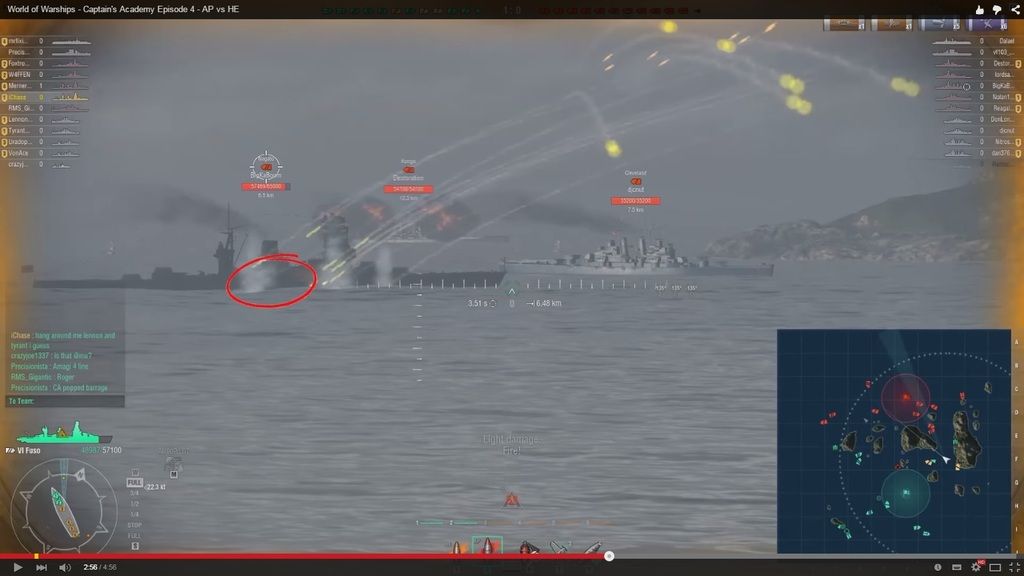
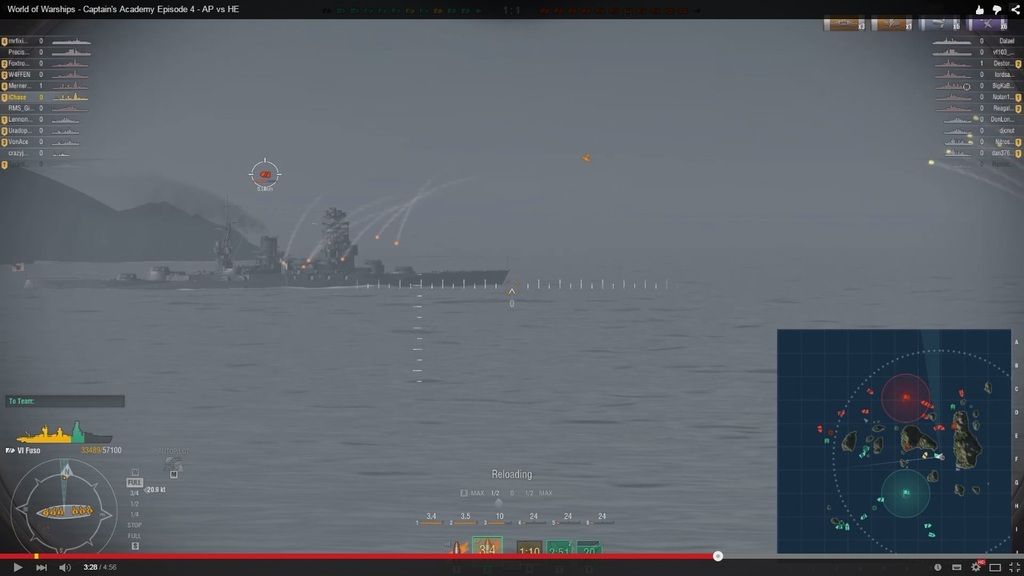
P/s đoạn 3-4 ko gây dame vì lúc tỏ rơi xuống nước thì nó bị chìm nhiw kiểu ông nhảy xuống nước ấy, mất một thời gian mới nổi lên đc nên ko gây dame do ko chạm đc vào tàu
P/s đoạn 3-4 ko gây dame vì lúc tỏ rơi xuống nước thì nó bị chìm nhiw kiểu ông nhảy xuống nước ấy, mất một thời gian mới nổi lên đc nên ko gây dame do ko chạm đc vào tàu
The Iron Eagle
Sam Fisher, Third Echelon Agent
- 4/8/06
- 15,245
- 331
nó bay auto thôi, scout chỉ dùng khi đi chỗ núi non hay có thằng quăng khói gì đó
- 17/11/08
- 7,550
- 4,155
203mm chở lên mới sài đc vs BB, 155mm thì vs CA thôi
- 1/8/09
- 4,650
- 2,700
Thiết kế module chung cho các tàu.
http://blog.worldofwarships.com/a-ship-through-the-eyes-of-a-game-designer/
http://blog.worldofwarships.com/a-ship-through-the-eyes-of-a-game-designer/
StormAndFire
C O N T R A
- 23/2/09
- 1,509
- 7
các loại đạn cũng đơn giản mà ... hiện tại chỉ có AP với HE sau này chắc có nhiều loại hơn.
Quy tắc chung khi dùng đạn là
súng 155mm trờ xuống HE only
súng 155mm trở lên thì AP là chủ yếu, HE tuỳ trường hợp
- Nếu cầm BB thì AP cho tất cả mọi thể loại BB khác và Crusier, gặp CV với DD thì tán HE tốt hơn AP mặc dù AP cũng xài được.
- Nếu cầm Crusier thì AP cho tất cả mọi đối tượng, HE chỉ dùng để đốt CV hoặc BB (súng nhỏ hơn 155mm thì bắn AP vào BB chỉ tổ gải ngứa nó thôi, HE đốt nó còn nhanh hơn)
- DD thì HE only, vì AP chả làm được tích sự gì cả ... @@
vit12345
Chrono Trigger/Cross
- 21/8/07
- 6,674
- 124
những con giáp mỏng hơn 300mm như Amagi, Kongo hay Myogi thì dùng 152 của mẽo hay 155 của Jap vẫn có thể đục được ở tầm 8-10km đổ lại. Hạng cùi dày như Fuso hay Nagato thì hoặc là <5km còn lại thì all HE.
DD Mẽo load AP có thể táng được Cruiser của Jap vì giáp tụinó khá mỏng.
DD Mẽo load AP có thể táng được Cruiser của Jap vì giáp tụinó khá mỏng.
Một số thuật ngữ dành cho Navy :BB: Battleship (Thiết giáp hạm/Chiến hạm).
CA: Heavy Cruiser (Tuần dương hạm hạng nặng).
DD: Destroyer (Khu trục hạm).
CV: Aircraft Carrier (Tàu sân bay).
- Ngoài ra còn có những ký hiệu khác hồi WW2 mà trong game chưa có:
BC: Battle Cruiser (Tuần dương hạm chủ lực/chiến đấu, cấp cao hơn CA, thấp hơn BB).
CL: Light Cruiser (Tuần dương hạm hạng nhẹ).
CVL: Light Aircraft Carrier (Tàu sân bay hạng nhẹ).
CVE: Escord Aircraft Carrier (Tàu sân bay yểm trợ hỏa lực).
SS: Submarine (Tàu ngầm).
- Thời hiện đại bây giờ:
CG: Cruiser, Guided Missile (Tuần dương hạm mang tên lửa).
CGN: Cruiser, Guided Missile, Nuclear-powered (Tuần dương hạm hạt nhân mang tên lửa).
DDG: Destroyer, Guided Missile (Khu trục hạm tên lửa).
SSN: Attack Submarine, Nuclear-powered (Tàu ngầm hạt nhân tấn công).
SSBN: Submarine Ballistic Nuclear, Ballistic Missile Submarine, Nuclear-powered (Tàu ngầm hạt nhân mang tên lửa đạn đạo liên lục địa).
+DD : Destroyer
Tàu khu trục.
VD: USS Fletcher DD-445
+SS : Submarine
Tàu ngầm.
VD: USS Nautilus SSN-571
+SSV : Submarine Aircraft Carrier
Tàu ngầm sân bay.
VD: I-400
+CL : Light Cruiser
Tuần dương hạng nhẹ .
VD: USS San Diego CL-53
+CLT : Torpedo-based Light Cruiser
Tuần dương hạng nhẹ mang ngư lôi .
VD: IJN Kitakami
+CA : Heavy Cruiser
Tuần dương hạng nặng.
VD: IJN Takao
+CAV : Aviation Cruiser
Tuần dương hàng không.
VD: IJN Mogami
+AV : Seaplane Tender
Tàu bảo trì thủy phi cơ. (Dùng cho scout)
VD: USS Tangier AV-8
**CVB/CV/CVL : Fleet Carrier**
Tàu sân bay cho cả hạm đội.
VD: USS Essex CV-9 , USS Lexington CV-2,.....
+CVL: Light Aircraft Carrier
Tàu sân bay hộ tống.
VD: USS Belleau Wood CVL-24
+CV : Standard Aircraft Carrier
Tàu sân bay.
VD: USS Hornet CV-8
+CV : Armored Aircraft Carrier
Tàu sân bay bọc thép.
VD: HMS Illustrious
+BB : Battleship
Tàu chiến/Chiến hạm.
VD: USS Iowa BB-61
+FBB : Fast Battleship
Chiến hạm chớp nhoáng
VD: IJN Kongo
+BBV : Aviation Battleship
Chiến hạm hàng không mẫu hạm.
VD: IJN Ise , Littorio Class battleship
+LHA : Landing Helicopter Assault
Tàu sân bay đổ bộ dành cho trực thăng.
VD: USS Saipan LHA-2 , USS America LHA-6 ,....
+LHD : Landing Helicopter Dock
Tàu sân bay đổ bộ dành cho cảng.
VD: USS Wasp , BPC Dixmude ,.....
+LPH : Landing Platform Helicopter
Tàu sân bay dành cho trực thăng.
VD: HMS Ocean L12 , Dokdo-class LPH
+AR : Repair Ship
Tàu sửa chữa/Tàu bảo trì.
VD: IJN Akashi
+AS : Submarine Tender
Tàu bảo trì tàu ngầm .
VD: USS Frank Cable AS-40
Tier 1:
+ Expert loader : tăng 30% tốc độ đổi loại đạn (cái này rất cần với BB)
+ Basic firing training : giám thời gian nạp đạn 10% cho súng cỡ <= 155mm và tăng 10% dmg cho súng AA (ko quan trọng lắm...)
+ Ship survavibility : giảm 15% thời gian sửa, chữa cháy, bơm nước (rất cần thiết)
+ Situation awareness : 6th sense (cần thiết cho CV, mấy class khác thì ko vì có cái perk còn hay hơn ở tier 2)
+ Expert rear gunner : tăng 10% hỏa lực chống fighter cho máy bay torpedo với dive bomber (CV rất cần)
Tier 2:
+ Aiming expert: tăng tốc độ xoay tháp pháo (2,5 độ/s cho súng <=155mm ; 0,7 độ cho súng >155mm)
+ Torpedo armement expertise : giảm 10% thời gian chuẩn bị torpedo bomber, giảm 10% thời gian nạp đạn torpedo (dành cho CV và DD và Kitakami)
+ Fire prevention : -7% fire chance (với tình hình HE hiện nay thì cái này là bắt buộc, dành cho CA và BB)
+ Incoming fire alert : báo cho biết có đạn bay đến chỗ mình (theo ta đây là bét perk in the game, ngon hơn Situation awareness nhiều)
+ Manual control : perk này bắt buộc cho CV để tự điều khiển máy bay thả bomb hay ngư lôi (WG to CV commander : pay the fucking 500 gold to retrain your commanderor play with auto aim for hundred battles)
Tier 3:
+ High alert : giảm 10% thời gian của Repair skill (cái này giờ khá phế, lý do sẽ nói sau).
+ Vigilance : +20% khoảng cách phát hiện ngư lôi (cái này chỉ nên xài cho những tàu có vòng cuaquá cao)
+ Dodging expert : tăng khả năng chiến đấu của fighter có speed thấp hơn khi giao chiến (chệnh lệch speed càng cao thì bonus càng cao) --> hiệu quả nhất cho CV Nhật hoặc giúp cho fighter tier thấp có thể đấu với fighter tier cao
+ Superintendent : +1 charge cho tất cả các skill consummable
Tier 4:
+ Demolition expert : tăng 3% khả năng gây cháy từ đạn và bomb (Atlanta, Cleveland và Des moines thích điều này)
+ Advanced firing training: tăng 20% tầm AA và 20% tầm súng <=155mm (Atlanta và BB thích điều này)
+ Last stand : khi bánh lái hay động cơ bị bắn hỏng, tàu vẫn di chuyển được (WTF WG is smoking about?)...nhưng với vận tốc bằng 1 nửa
+ Aircraft service expert : giảm 10% thời gian chuẩn bị máy bay, tăng 5% máu cho máy bay
Tier 5 :
+ Last chance : giảm 9 % thời gian nạp đạn cho tất cả súng trên tàu khi tàu dưới 20% máu (kể cả main gun secondaries và AA), 1 perk tuyệt vời cho BB và CA
+ Preventive maintenance : giảm 34% khả năng module bị bắn hỏng (perk dành cho những tàu ít ụ súng)
+ Concealment expert: giảm khoảng cách bị phát hiện (10% cho DD, 12% cho CA, 14% cho BB, 16% cho CV) (cần thiết cho DD, 1 số CA và CV)
+ Air supremacy : +1 máy bay cho fighter và bomber squad (cần thiết cho CV, nhất là CV Mỹ)
+ Jack of all trade : giảm 10% thời gian cooldown cho các skill
module thì muốn citadel hit nhiều thì nên lắp cái + gun accuracy
cái giảm thời gian sửa main gun là bắt buộc, chả ai điên mua cái + máu cho AA hay secondary làm gì. Cái giảm khả năng hư torpedo tube thì có thể mua cho DD Nhật do vũ khí hci1nh nó là torpedo
DD với CA thì nên lắp cái +20% khả năng tăng tốc
BB có thời gian xoay bánh lái (rudder changing time) cao thì thì nên lắp cái giảm 20% thời gian xoay bánh lái
BB với CV thì nên xài cái giảm thời gian sửa chữa
mấy cái + range cho AA, main gun hay secondary gun thì thích thì gắn, ko thích thì thôi....
cái slot chọn giữa +20% acquisition dítance với +10% camo thì nên chọn camo vì cái kia hiện tại vô dụng
CA, BB thì nên dùng cái giảm khả năng cháy
DD thì nên chọn cái giảm thời gian sửa động cơ vì bị bắn hư động cơ là chết luôn
Chỉnh sửa cuối:
- 17/5/05
- 1,276
- 240
Sao mình dùng acc của WoT không chơi được WoWS vậy, hay phải đăng ký thêm cái gì nữa thế ?
The Iron Eagle
Sam Fisher, Third Echelon Agent
- 4/8/06
- 15,245
- 331
chung acc mà, xem lại pass đê, mà server nào cho server đó thôi nháSao mình dùng acc của WoT không chơi được WoWS vậy, hay phải đăng ký thêm cái gì nữa thế ?
)))- 17/5/05
- 1,276
- 240
Hèn gì, chơi SEA, đăng nhập hoài không được, phải tạo cái acc ở NA =.=chung acc mà, xem lại pass đê, mà server nào cho server đó thôi nhá
- 19/3/11
- 1,181
- 18
bác nào hướng dẫn bắn citadel cái, e chỉ biết áp sát rồi bắn ngang hull thôi, còn ở xa thì bó tay
Similar threads
- Trả lời
- 0
- Đọc
- 224
- Trả lời
- 16
- Đọc
- 1K
- Trả lời
- 0
- Đọc
- 27